


Are inclined to your creativity with a bouquet of spring borders! The Watering Cans BMC crafts an lovable border of watering cans of assorted sizes. See how you should use this BMC with the Springtime Soiree assortment to make contemporary borders that can make your layouts bloom.

To create these borders you will have:

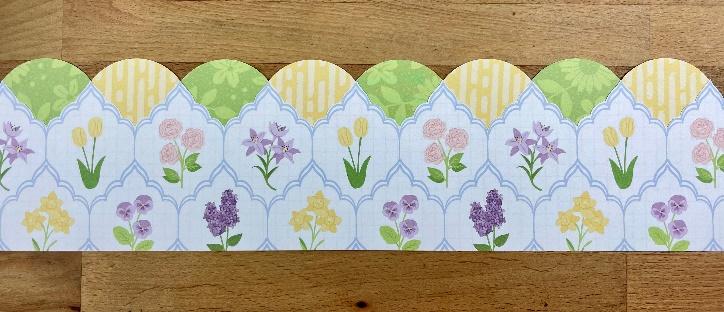
Hooray for Spring

Step 1: Fussy lower the highest fringe of a bit of framed flowers paper, then lower 2-3/4” from the highest factors. This would be the base of the border.
Step 2: Utilizing the Circle Punch, punch 4 circles from the yellow strains paper and 4 circles from the inexperienced floral paper. Adhere the circles from the again facet of the border in between every level of the earlier piece.
Step 3: Utilizing Avocado Strong Cardstock, punch one edge utilizing the Watering Cans BMC within the Border Maker System.
Step 4: Utilizing inexperienced floral paper, punch one edge utilizing the Watering Cans BMC.
Step 5: Adhere the inexperienced floral piece to the highest of the cardstock piece, barely offset to provide it a “shadow.” Reduce this piece 1-5/8” from the highest fringe of the watering cans in your trimmer. Adhere to the decrease fringe of the border.
Step 6: Reduce a bit of yellow strains paper to measure 12” x ¾”. Adhere about ¼” from the underside fringe of the border.
Step 7: Reduce a bit of avocado cardstock to measure 12” x ¼”. Adhere about 1/16” from the underside fringe of the yellow strains paper.
Step 8: Use Brown Twin-Tip Pen to attract fake stitching alongside the arches of the circles.
Step 9: Adhere stickers for title as desired.
Welcome Spring

Step 1: Reduce a bit of Canary Strong Cardstock to measure 12” x 2-1/2”, utilizing the Colonial Blade on the 12-inch Trimmer on one edge. Use this piece as the bottom of the border with the ornamental edge alongside the underside.
Step 2: Reduce a bit from Eggplant Strong Cardstock to measure 12” x 2”, utilizing the Colonial Blade on the 12-inch Trimmer on one edge. Adhere to the border with the ornamental edge on the highest.
Step 3: Reduce a bit of purple petals paper to measure 12” x ½”. Adhere alongside the underside fringe of the eggplant cardstock piece.
Step 4: Utilizing the Watering Cans BMC within the Border Maker System, punch an edge from yellow strains paper, then lower 1-5/8” from the highest. Adhere to the highest fringe of the purple petals paper.
Step 5: Adhere the layered border over the yellow strains, alongside the sting of the purple petals paper.
Step 6: Adhere title sticker and bicycle sticker utilizing Foam Squares.
Floral Border

Step 1: Utilizing the Scallop Blade on the 12-inch Trimmer, lower a bit of Purple Ice Strong Cardstock to measure 2-3/8” x 12”. That is the bottom of the border.
Step 2: Reduce a bit of multicolored stripes paper to measure 2” x 12”. Adhere to the middle of the border.
Step 3: Utilizing the Watering Cans BMC within the Border Maker System, punch alongside the sting of Eggplant Strong Cardstock. Reduce from the highest fringe of the watering cans 2”. Then lower into 2” increments. Adhere to the multicolored stripes paper, flipping each different one.
Step 4: Reduce six items from the beige dots paper to measure 1-3/4” x 1”. Adhere to the decrease portion of every phase.
Step 5: Adhere flower sticker and title to every beige dots piece, rotating by inserting the sticker on the fitting facet of left facet of the beige dots piece. Use scissors to chop any extra stickers off alongside the underside edges of every piece.
Inform us within the feedback which border is your favourite! 🌿
P.S. Are YOU a member of the Digital Crop Fb Group? It’s your go-to place for MONTHLY Digital Crops, MONTHLY Accomplished Album Challenges, QUARTERLY Secret Field Openings with venture tutorials and a lot extra! We hope you’ll be part of our neighborhood of greater than 44,000 fellow memory-keeping fanatics — you’ll really feel proper at house!


