


At present, we’re going to take pleasure in a little bit of Sew Enjoyable – musing a couple of sew, questioning about its title, and displaying you the way it’s labored.
Sew Enjoyable! is that this sequence of sewing tutorials right here on Needle ‘n Thread. Within the sequence, we discover totally different embroidery stitches largely as mixtures or composites, utilized in other ways and providing a variety of prospects for additional exploration.
I began the Sew Enjoyable! sequence again in 2012, and the checklist of tutorials is pretty first rate. Not exhaustive by any means, however a superb checklist to discover attention-grabbing stitches, mixtures, composites, and strategies.
The entire level of the sequence has all the time been to have enjoyable exploring stitches.
At present’s sew exploration doesn’t actually have a correct title that I can discover. It’s a mixture of two layers of herringbone, certainly one of which is laced into the opposite. So perhaps we may name it layered herringbone or one thing to that impact.
It happened as a result of a reader despatched me a query a couple of brief video that she discovered on-line, the place the sew demonstrated within the video was known as “double herringbone.”
The video had no voiceover or clarification of something, and it was shifting at a fast clip to suit the entire thing into 30 seconds or much less – and… effectively, you know the way they’re!
She couldn’t discover any approach to replicate what she noticed, as a result of any seek for double herringbone introduced up a whole totally different wanting sew.
It’s arduous to clarify in writing what’s occurring with a sew and the way it’s occurring, so I made a decision to take some images and do the entire Over-Explaining Factor concerning the sew that was demonstrated within the video.
So, right here we go…

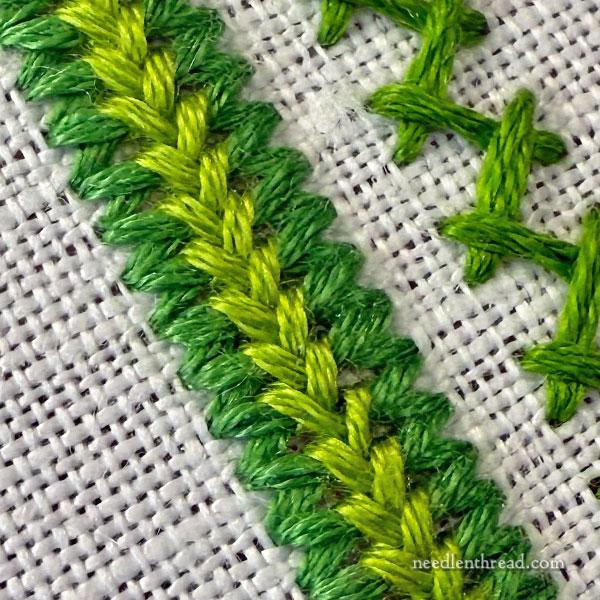
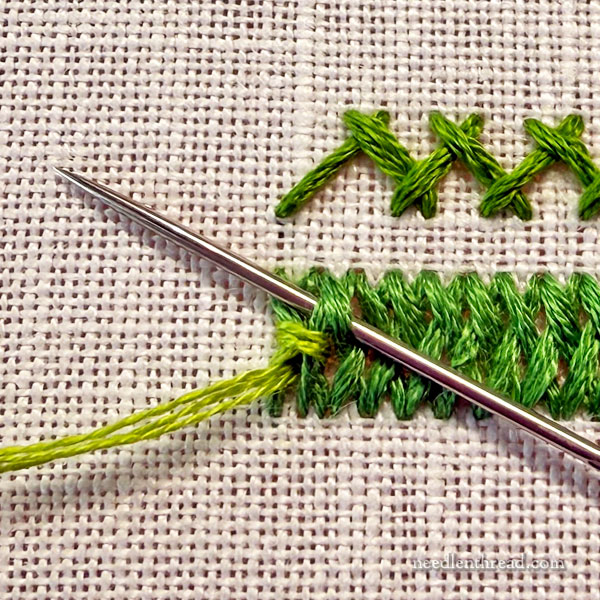
Within the photograph above, the higher, open band is your typical herringbone sew. The band beneath it’s what we’re going to discover.
For those who’re unfamiliar with the herringbone sew, you’ll be able to discover a tutorial for it right here.
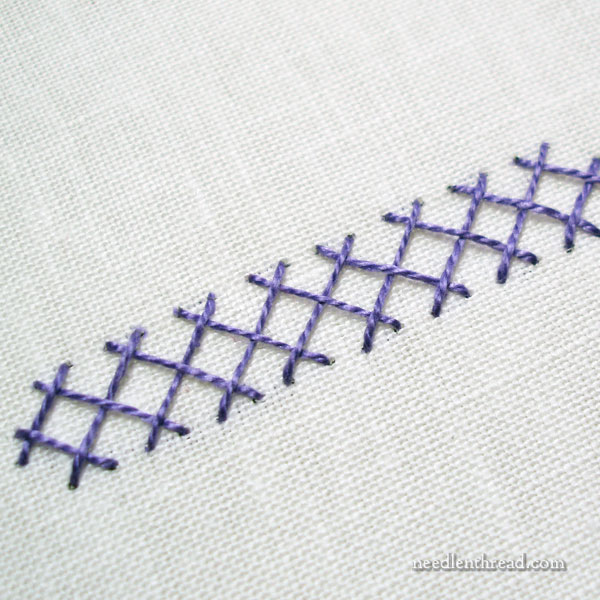
On this photograph above, you’ll be able to see the standard double herringbone sew, which consists of two passes of herringbone sew, the second return go interweaving with the primary go in an over-under sequence as every sew is accomplished.
Double herringbone sew provides an additional stage of complexity to the sew. It may be a really attention-grabbing sew – nice for ornamental borders, a pleasant addition to band samplers, wonderful for embellishing loopy quilt seams – however you need to assume forward once you work it, in order that the over-under and under-over sequences work out to a pleasant woven impact.
You may discover a tutorial for double herringbone sew right here.
For those who’d prefer to be taught even extra about herringbone, this 36-page Sew Play Printable on interlaced herringbone sew takes double herringbone even farther with a layer of interlacing. We discover bands, frames, round frames and extra, labored with interlaced herringbone. By the point you make your means by the printable, you’ll be a grasp of herringbone sew!
However let’s speak about this notion of a layered herringbone sew.
Within the brief video that my reader despatched me, the stitcher labored a really huge herringbone band. In actuality, stitches that lengthy (they had been in all probability an inch or longer) would by no means keep stability in any completed piece of embroidery.
Over the herringbone sew band, she then labored one other layer of herringbone, however she didn’t go by the material. As a substitute, she labored the brand new layer of herringbone over the muse layer of very lengthy stitches, catching the brand new thread across the intersections of the earlier layer of herringbone.
The entire strategy was positively extra of a “laced” herringbone approach, however as a result of the motion of the “lacing” (the place she’s passing underneath the earlier herringbone stitches with out choosing up cloth) was the identical motion as a herringbone sew, I suppose because of this she known as the sew a double herringbone.
I’m calling it layered herringbone, as a result of it’s one other herringbone sew line successfully layered on high of the herringbone basis, with out choosing up any cloth. And whereas it’s a laced sew, to name it laced herringbone may result in confusion, as a result of laced herringbone is already a reasonably widespread strategy to embellishing herringbone sew.
Step-by-Step Method
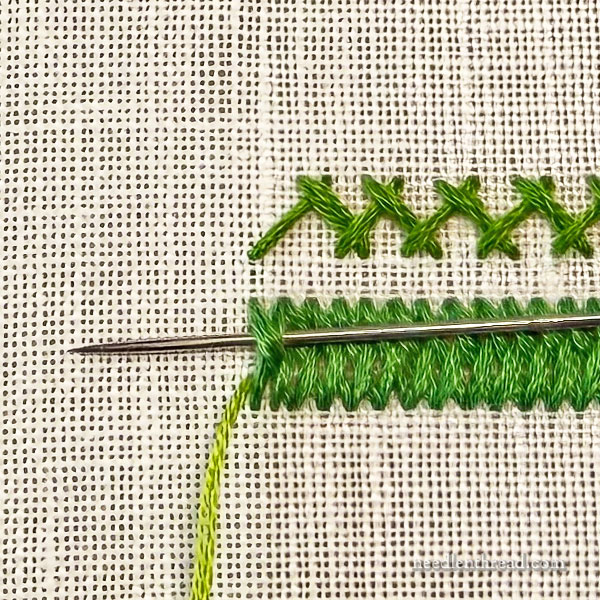
So, to display, utilizing six strands of floss within the needle, I’m starting with a strong herringbone sew band, with the herringbone labored shut collectively in order that there’s not any noticeable house between the stitches. That is known as “closed herringbone.” Discover that there’s no house between the stitches, like there’s within the high band of herringbone.
Subsequent to the muse of closed herringbone, I introduced up a brand new thread (lighter inexperienced – nonetheless six strands), simply to the left of the muse band.
For this subsequent layer of herringbone, I’m going to work on high of the muse band, lacing underneath the muse stitches with out choosing up any cloth.
I’ve introduced my new thread to the entrance on the left aspect of the band, and I’m following the identical motion of the herringbone sew by crossing as much as the highest, passing the needle again underneath the intersection of the primary set of herringbone stitches, and pulling the thread by.
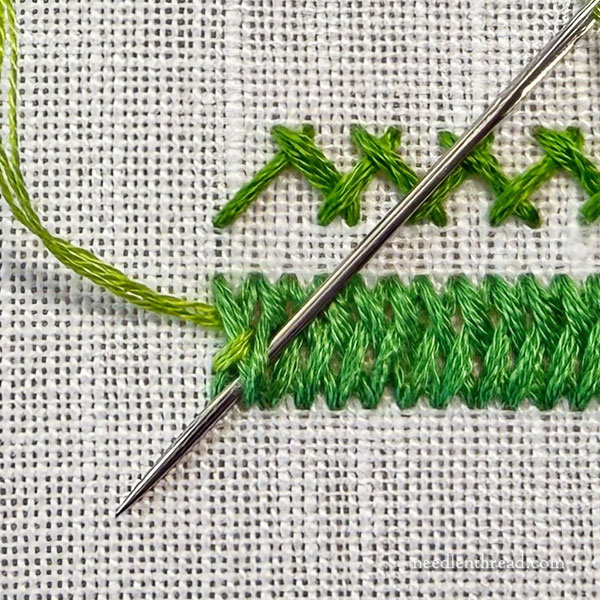
Then, shifting ahead, I’ll cross all the way down to the bottom of the band, take the needle again underneath the subsequent intersection within the basis threads and out to the entrance of the band, and pulling by.
Then, again to the higher intersection in the direction of the highest of the band, passing backwards underneath that intersection and out between the stitches, and pulling by.
The motion is strictly the identical motion as working the herringbone sew, with out choosing up cloth. As a substitute, the “intersections” of the muse row present the construction for holding the brand new layer of herringbone in place.
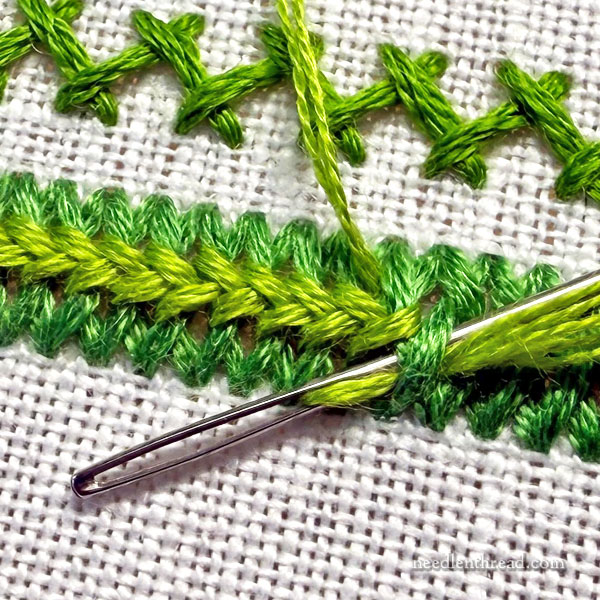
The entire lacing course of is infinitely simpler for those who use a tapestry needle with a blunt tip, so that you just don’t snag the muse stitches.
For those who don’t have a tapestry needle, you’ll be able to sew with the needle eye-first, as proven within the photograph above.
That is what a really inflexible, straight band of “layered herringbone” seems like, when full.
When you get the motion of the sew down and follow how the highest layer works into the muse, you should use the approach in several methods to fill comparatively small and slim shapes (leaves and petals come to thoughts), to work meandering ornamental bands, perhaps to create stylized, textured trunks and branches – all of this stuff beg for experimentation!
So there’s some Sew Enjoyable! for you!
And that, my buddies, is my tackle a “layered” herringbone sew. After all, I’m open to calling it something – and perhaps it’s already received a reputation – however let’s not name it “double herringbone,” as a result of it’s not double herringbone.
Extra Stitches, Extra Enjoyable!
Right here on Needle ‘n Thread, you could find an entire bunch of sew tutorials that can assist you get into the enjoyable of exploring stitches!
Right here’s an index of how-to video tutorials, with over 75 sew movies to your studying pleasure.
And the Sew Enjoyable Index affords step-by-step photograph tutorials on a good wider vary of stitches, mixtures, composites, and strategies.


